VPC Lab with Public and Private Subnets, Connecting internet from EC2 Instance in private subnet using NAT Gateway
Introduction:
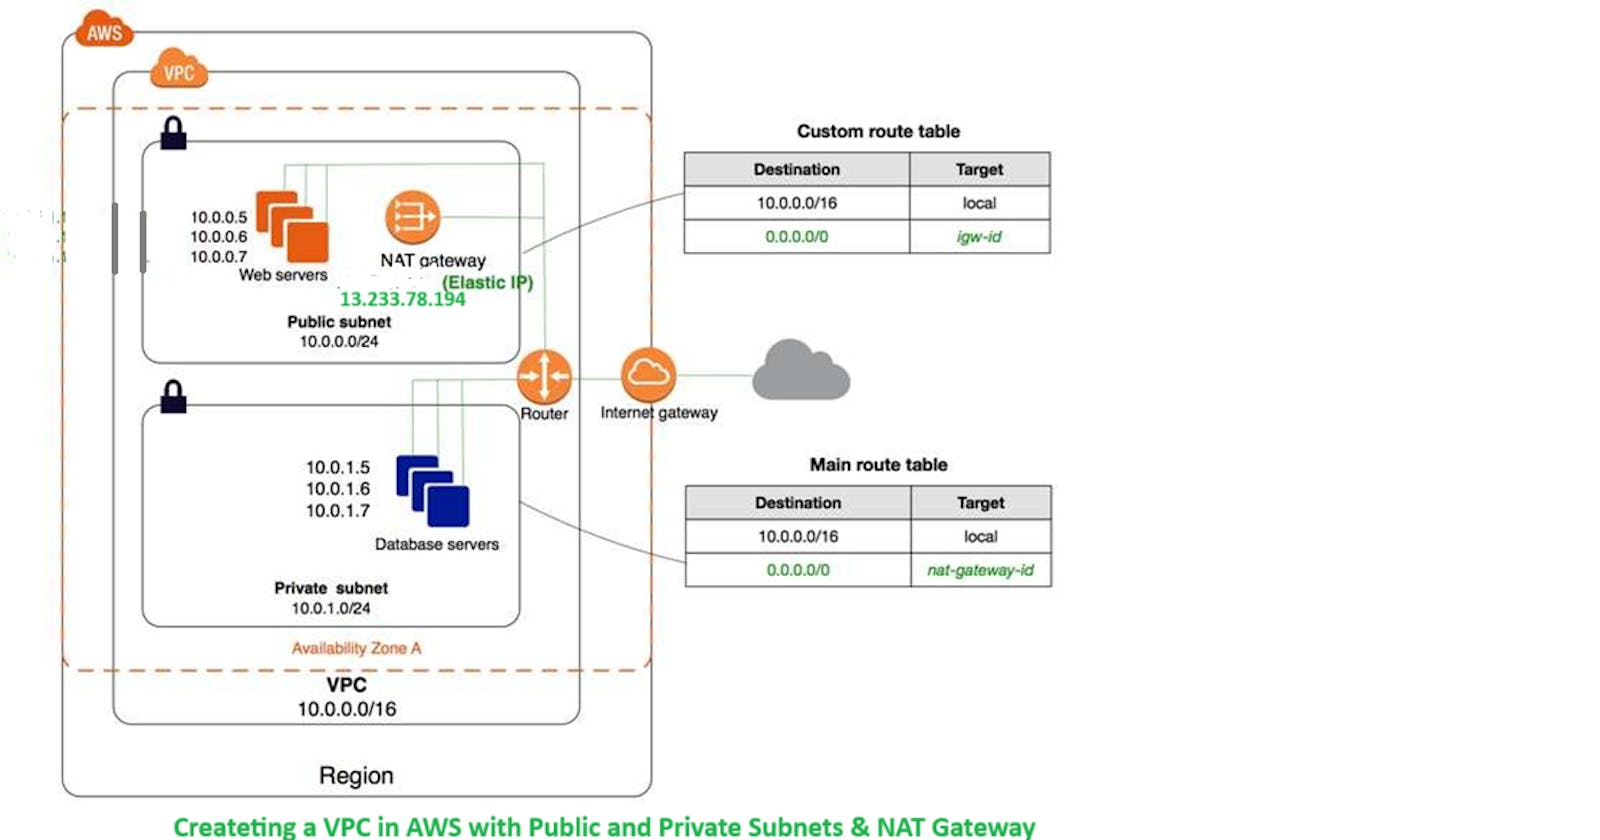
AWS VPC enables you to build a virtual network in the AWS cloud. You can define your own network space, and control how your network and the Amazon EC2 resources inside your network are exposed to the Internet. Setting up a Virtual Private Cloud (VPC) with both public and private subnets is a fundamental architecture in cloud computing. It allows you to control internet access for different types of resources while maintaining security. Using a Network Address Translation (NAT) Gateway, you can enable internet access for instances in private subnets without exposing them directly to the internet.
Importance of private and public subnets:
VPC allows you to create a well-architected and secure environment for your cloud-based applications. Public subnets can send traffic to the internet, while private subnets provide an additional layer of security for sensitive components and data. This approach enables you to achieve a balance between accessibility and security, ensuring your cloud infrastructure is robust and protected. Instead, the EC2 instances in the private subnet can access the internet by using a network address translation (NAT) gateway that resides in the public subnet.
Step-by-step guide for creating VPC
Create VPC:
a. Go to the AWS console, click on service, Search VPC then Click on "Create VPC."
b. Provide a name for your VPC(you can choose any name).
c. Define the IPv4 CIDR block for your VPC, such as "10.0.0.0/16."


Create Subnets:
Go to "Subnets" in the VPC Dashboard.
Choose "Create subnet" and select your VPC(which is created by you).
Create 2 subnet public subnet and private subnet.
a. Create a public subnet:
Pick an availability zone.
Name the subnet(choose any name).
Set an IPv4 CIDR block (e.g., "10.0.0.0/24").
b. Create a private subnet:
Repeat the same process in a different availability zone.
Define an IPv4 CIDR block (e.g., "10.0.1.0/24").

2 Subnet Created:

Create Internet Gateway (IGW):
In the VPC, select "Internet Gateways."
Click "Create internet gateway" and attach it to your VPC.
IG Created:

Attached to the VPC:

Create 2 Route Table(Public and Private):
Go to VPC sellect "Route table"
Click on Create route table:

2 route table created:

Note: We can also edit in the existing route table, but in learning purposes new route table created.
Now, After creating route table go to public route table then go to subnet association edit and associate public subnet in subnet association:

Now Go to route in the public route table, then edit and provide 0.0.0.0/0 IGW to reach that subnet to the internet.

Go to private route table then go to subnet association edit and associate private subnet in subnet association:
Launch Instances: (Launch 2 EC2 Instances)
Launch a public EC2 instance in the public subnet:
a. sellect your VPC
b. sellect your public subnet
c. enable Auto assign public ip.
d. create security group enable SSH/RDP, HTTP,HTTPS.
Launch a private instance in the private subnet:
Repeat same process for Private EC2 instance:
a. only desable auto assign public IP.

Test Connectivity:
Verify that the public instance can access the internet directly.
Ensure that the private instance has restricted internet access through the NAT Gateway.
Select created instance--> Go to connect-->Click on RDP client --> Download remote desktop file-->Go down click on get password-->click on upload private key file. sellect the .pem file which is created(Private key). Click on decrypt password and then coppy this password in notepad. Now click on the downloaded RDP then paste the decrypt password. Now your RDP is launched.

For public EC2 Getting Ping Directly :

Private EC2 don't have public Ip so, we can't access internet directly. If we want access internet through private EC2, NAT gateway is used.

Unable to access Remote desk top:

We acn assess this private instance through public instance. Go to public instance search RDP in search bar, Open RDP login throuh private IP. But Unable to access internet through this EC2 instance.

We can access internet through private EC2 instance, using NAT Gateway:
Create NAT Gateway.
You can use a network address translation (NAT) gateway to enable instances in a private subnet to connect to the internet or other AWS services, but prevent the internet from initiating a connection with those instances.


Go to the route table associated with the private subnet.
Edit the routes and add a route for "0.0.0.0/0" pointing to the NAT Gateway.
Now we can see getting ping:

Note: After performing Lab Delete All thing properly which is created by you other waise you charged for this service.
