Kubernetes Cluster architecture, components, configuration & Installation with Kubeadm.


Introduction:
In the world of container orchestration, Kubernetes is an open-source container orchestration platform that automates the deployment, scaling and resilience to ensure that applications are always available to users and manage the containerized applications. Kubeadm is a tool used to bootstrap a Kubernetes cluster. It automates many of the manual steps involved in setting up a Kubernetes cluster, making it easier to get started with Kubernetes. In this guide, we'll walk you through the process of setting up a Kubernetes cluster using Kubeadm on Ubuntu.
Prerequisites:
Before we dive into the installation process, let's make sure we have everything we need:
Ubuntu OS (Xenial or later): We'll use Ubuntu as our operating system.
Internet access: To download necessary packages.
t2.medium instance type or higher: This guide assumes you have access to suitable hardware.
Both Master & Worker Node: For a fully functional cluster.
#.Kubernetes Architecture and Components.
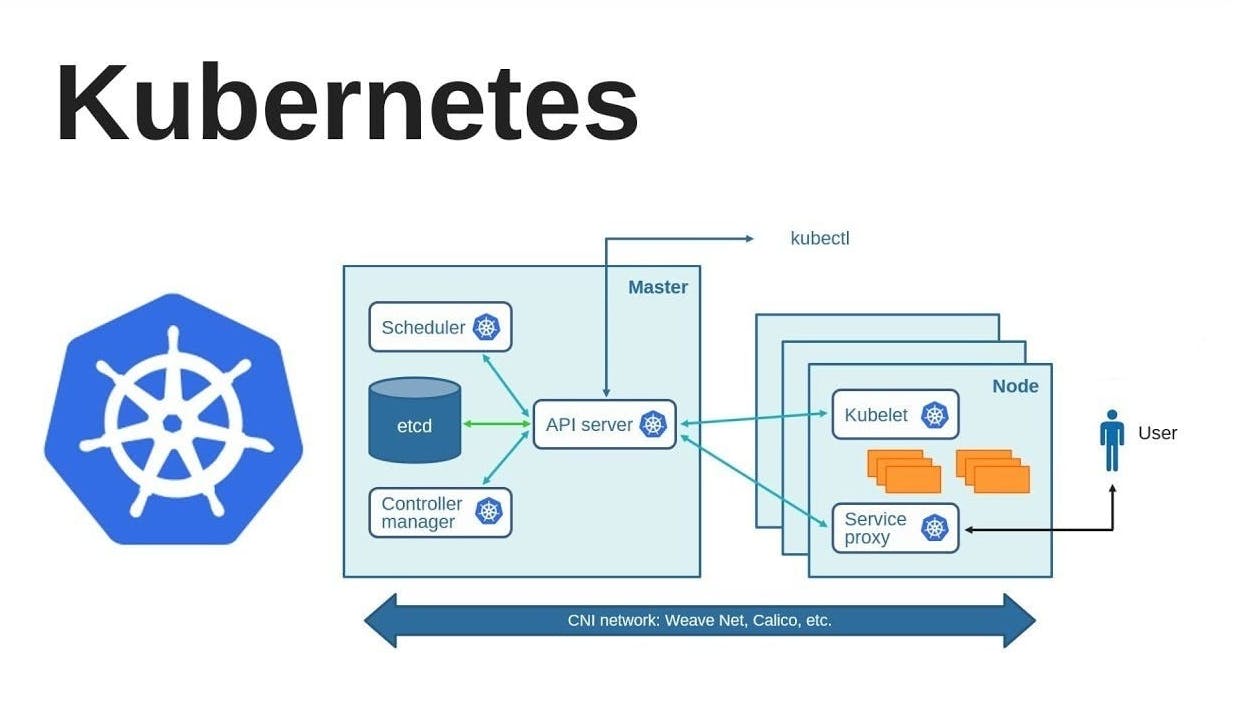
Kubernetes architecture is divided into two main components:
- Master node: The master node is responsible for managing the cluster and all of its resources. It consists of several components that interact with each other to manage the state of the cluster. These components include:
API server: This is the "front desk" of Kubernetes. It is responsible for exposing the Kubernetes API, validating and processing requests, and updating the state of the API objects in etcd.
etcd: It stores all the information about your cluster. It is a distributed key-value store used to store the configuration data of the cluster. It stores the state of the API objects and maintains the consistency of the cluster.
Controller manager: It is responsible for managing the different controllers that regulate the state of the cluster. These controllers include the ReplicaSet controller, Deployment controller, and Node controller.
Scheduler: It is responsible for scheduling the workloads on the worker nodes based on the available resources.
- Worker node: The worker node is responsible for running the application workloads. Each worker node runs a container runtime, such as Docker, to run the containerized application. The worker node consists of the following components:
Kubelet: It is an agent that runs on each node and is responsible for managing the state of the pods running on that node.
kube-proxy: It is a network proxy that runs on each node and is responsible for routing traffic to the appropriate pod.
Container runtime: It is responsible for running the containers on the node. Docker is a commonly used container runtime with Kubernetes.
The communication between the master node and the worker nodes is done through the Kubernetes API server. The API server exposes the Kubernetes API, which can be accessed by various clients, such as kubectl or the Kubernetes dashboard.
Kubernetes Other Components:
Pod: In the Kubernetes, Pod is the smallest and most basic unit. It represents one instance of a process that is currently operating in a cluster. One or more containers that share the same network namespace and storage volumes can be found in a pod.
Replica-set: A ReplicaSet is responsible for ensuring that a specified number of pod replicas are running at any given time. It can be used to scale the number of replicas up or down based on the demand for the application.
Deployment: Managing the creation and upgrading of ReplicaSets is a Deployment. It allows for rolling updates and rollbacks and offers a declarative method of managing the application's state.
Service: A Service provides a stable endpoint for accessing a set of Pods. It enables communication between different parts of an application or between different applications in a cluster.
Volume: A Volume is a directory that is accessible to containers running in a Pod. It enables data to be shared between containers and persist data even when a container is terminated.
ConfigMap: A ConfigMap is used to store configuration data that is consumed by containers in a Pod. It provides a way to separate configuration from application logic and enables easy updates to configuration data.
Secret: Similar to a ConfigMap, a Secret is used to store private information like API keys or passwords. It offers a means for apps in a cluster to safely store and manage sensitive data.
Ingress: An ingress is a device that makes HTTP and HTTPS routes accessible to services inside a cluster from the outside. It makes applications operating in a Kubernetes cluster accessible from the outside.
#. Kubernetes installation and configuration.
Update and Install Docker
Run the following commands on both the master and worker nodes to prepare them for Kubeadm:
    sudo su
    apt update -y
    apt install docker.io -y
    systemctl start docker
    systemctl enable docker
Kubernetes relies on Docker containers, so it's essential to have Docker installed and running on all nodes.
Add Kubernetes Repository and Install Kubeadm
To add the Kubernetes repository and install Kubeadm, Kubectl, and Kubelet components, execute:
    curl -fsSL "https://packages.cloud.google.com/apt/doc/apt-key.gpg" | sudo gpg --dearmor -o /etc/apt/trusted.gpg.d/kubernetes-archive-keyring.gpg
    echo 'deb https://packages.cloud.google.com/apt kubernetes-xenial main' > /etc/apt/sources.list.d/kubernetes.list

    apt update -y
    apt install kubeadm=1.20.0-00 kubectl=1.20.0-00 kubelet=1.20.0-00 -y
Initialize the Kubernetes Master Node
Run this command to initialize the Kubernetes control plane on the master node:
sudo su kubeadm init
Set Up Local Kubeconfig
To interact with the Kubernetes cluster from your local machine, create the Kubeconfig file:
    mkdir -p $HOME/.kube
    sudo cp -i /etc/kubernetes/admin.conf $HOME/.kube/config
    sudo chown $(id -u):$(id -g) $HOME/.kube/config
Apply Weave Network Plugin
Use this command to apply the Weave network plugin, which ensures pod-to-pod communication:
kubectl apply -f https://github.com/weaveworks/weave/releases/download/v2.8.1/weave-daemonset-k8s.yaml
Generate Token for Worker Nodes
Generate a token for worker nodes to join the cluster:
Here I created 2 Tocken and joined 2 worder Node
kubeadm token create --print-join-command

Expose Port 6443 for Worker Node Connectivity 🔗
Ensure that port 6443 is accessible from your worker nodes to the master node. This is essential for the worker nodes to communicate with the control plane.

Worker Node Setup:
Reset Kubeadm and Join Worker Node
On the worker node, execute the following commands:
sudo su kubeadm reset pre-flight checksThen, paste the join command you obtained from the master node during token creation and append
--v=5for verbose output:Here I created 2 Tocken and joined 2 worder Node
kubeadm join <master-node-ip>:6443 --token <token> --discovery-token-ca-cert-hash <hash> --v=5


Verification
On the master node, run:
kubectl get nodesThis should display both the master and worker nodes as part of your Kubernetes cluster.

Testing a Demo Pod : To verify your cluster's functionality, you can deploy a demo pod:
      kubectl run nginx --image=nginx --port=80
      kubectl expose pod nginx --port=80 --type=NodePort


Enable the port range 30000-32767 for the node-port on worker node:

Now, type the below command to know the node-port for the pod
kubectl get svc

This will run a simple pod:

Copy the public-ip of workernode: nodeport in the browser to get the nginx output:
